How to Install Floating Shelves in Any Room
This comprehensive guide will walk you through everything you need to know to install floating shelves from choosing the right materials to mounting them.
Floating shelves are a stylish and practical addition to any home. Whether you’re aiming for a minimalist look or simply need extra storage space, learning how to install floating shelves is a valuable skill. This comprehensive guide will walk you through everything you need to know to install floating shelves in any room, from choosing the right materials to mounting them securely and stylishly.
Why Choose Floating Shelves?
Floating shelves offer numerous benefits:
- Sleek Aesthetics: No visible brackets or supports for a clean, modern appearance.
- Versatility: Perfect for living rooms, kitchens, bathrooms, bedrooms, and even hallways.
- Space-Saving: Ideal for small rooms where floor space is limited.
- Customizable: Can be tailored to match your home decor and storage needs.
Planning Your Floating Shelves Installation
Before you start drilling holes, you need a plan:
1. Determine the Purpose
Are the shelves for displaying decorative items, holding books, or storing kitchen essentials? This will influence your choice of materials and hardware.
2. Choose the Right Location
Consider wall space, lighting, furniture placement, and traffic flow. Common locations include:
- Above sofas
- Beside bathroom mirrors
- Over desks or workstations
- In kitchen corners
3. Measure and Mark
Use a tape measure to find the exact placement. Mark the wall with a pencil to visualize the final look. Consider shelf height and spacing between multiple shelves.
4. Select Suitable Materials
Popular materials for floating shelves include:
- Wood (Pine, Oak, Walnut): Durable and easy to customize.
- MDF: Budget-friendly and smooth.
- Metal or Glass: For a modern or industrial look.
Tools and Materials Needed
To install floating shelves, you’ll typically need:
- Floating shelf brackets or mounting hardware
- Stud finder
- Drill and drill bits
- Level
- Screws and wall anchors
- Pencil
- Measuring tape
- Screwdriver
Optional:


- Paint or stain (if customizing shelves)
- Sandpaper
- Safety gear (goggles, gloves)
Step-by-Step: How to Install Floating Shelves
Step 1: Locate Wall Studs
Use a stud finder to identify wall studs. Attaching shelves to studs ensures maximum support. If you can’t find studs, use heavy-duty wall anchors.
Step 2: Mark Mounting Points
Hold the bracket against the wall and use a level to ensure it’s straight. Mark the screw holes with a pencil.
Step 3: Drill Pilot Holes
Drill small pilot holes where you’ve marked the wall. This makes it easier to insert screws and prevents drywall damage.
Step 4: Install Brackets
Attach the brackets to the wall using screws. Double-check alignment with a level before tightening fully.
Step 5: Mount the Shelf
Slide the shelf onto the brackets. Depending on the design, you may need to screw the shelf into the bracket or let it rest freely.
Step 6: Check Stability
Ensure the shelf is secure and level. Gently apply pressure to test its sturdiness.
Tips for a Successful Installation
- Use a Level: Essential for straight and even shelves.
- Double Up for Heavy Loads: Use multiple brackets or a more robust design if holding heavy items.
- Consider Hidden Brackets: For a true floating look, use concealed hardware.
- Mind the Wall Type: Drywall, plaster, and concrete all require different anchors and tools.
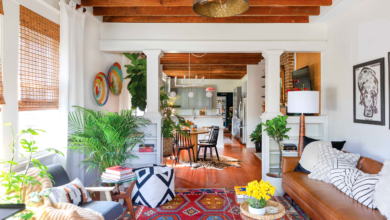
Room-by-Room Ideas for Floating Shelves
Living Room
- Display art, family photos, and plants.
- Create a feature wall with staggered shelves.
Kitchen
- Store spices, mugs, or cookware.
- Use reclaimed wood for a rustic touch.
Bathroom
- Keep toiletries, towels, or candles handy.
- Opt for moisture-resistant materials.
Bedroom
- Replace nightstands with floating shelves.
- Add mood lighting underneath for ambiance.
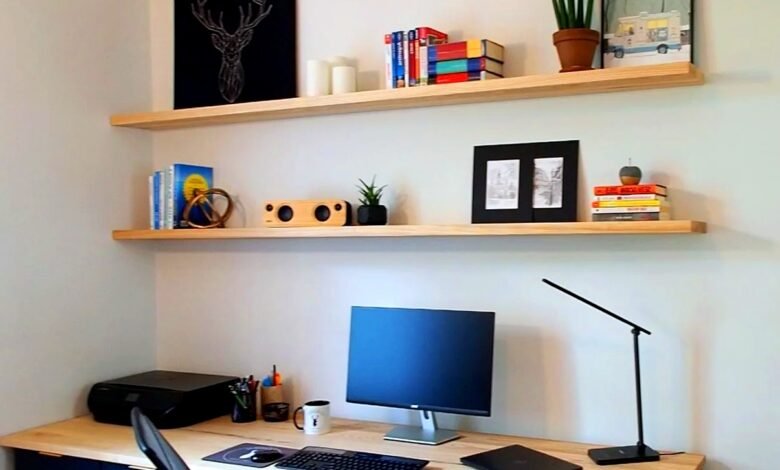
Home Office
- Organize books, supplies, and decor.
- Combine floating shelves with a desk for a streamlined setup.
Maintenance and Safety
- Dust Regularly: Keeps shelves and items looking fresh.
- Avoid Overloading: Check manufacturer weight limits.
- Inspect Mounts Periodically: Ensure brackets remain secure over time.
Floating Shelf Alternatives
If traditional floating shelves aren’t right for your space, consider:
- Corner Shelves: Make use of unused nooks.
- Box Shelves: Add dimension and structure.
- Picture Ledges: Ideal for rotating art or photos.
Common Mistakes to Avoid
- Skipping the Stud Finder: Leads to weak installations.
- Uneven Shelves: Always double-check with a level.
- Wrong Anchors: Match anchors to wall type and shelf weight.
- Ignoring Clearance: Leave enough space above and below shelves.
Final Thoughts
Learning how to install floating shelves empowers you to enhance your home’s functionality and aesthetic appeal. Whether you’re refreshing a single room or tackling a full-home makeover, floating shelves are a versatile solution. From selecting the right materials to securing the perfect mount, a thoughtful approach ensures lasting results.
Installing floating shelves doesn’t require professional help—just a bit of planning and some DIY spirit. With this step-by-step guide, you’re ready to install floating shelves in any room and elevate your living space with style and smart storage.
FAQs About Installing Floating Shelves
Q: Can I install floating shelves on drywall?
A: Yes, but use proper wall anchors if you’re not hitting a stud.
Q: How much weight can a floating shelf hold?
A: It varies—typically 15-50 pounds depending on materials and hardware.
Q: Do I need to paint or seal wooden shelves?
A: For longevity and style, yes. Use paint or wood stain and a sealant.
Q: Are floating shelves removable?
A: Most are, especially if designed with detachable brackets.
Q: What’s the best way to hide hardware?
A: Use shelves with concealed mounting systems or pre-routed backs.
By following this guide, you’ll gain the confidence to install floating shelves like a pro. Whether you’re optimizing storage or enhancing decor, this project is a rewarding way to improve any space in your home.